Before you start
Minimum device requirements
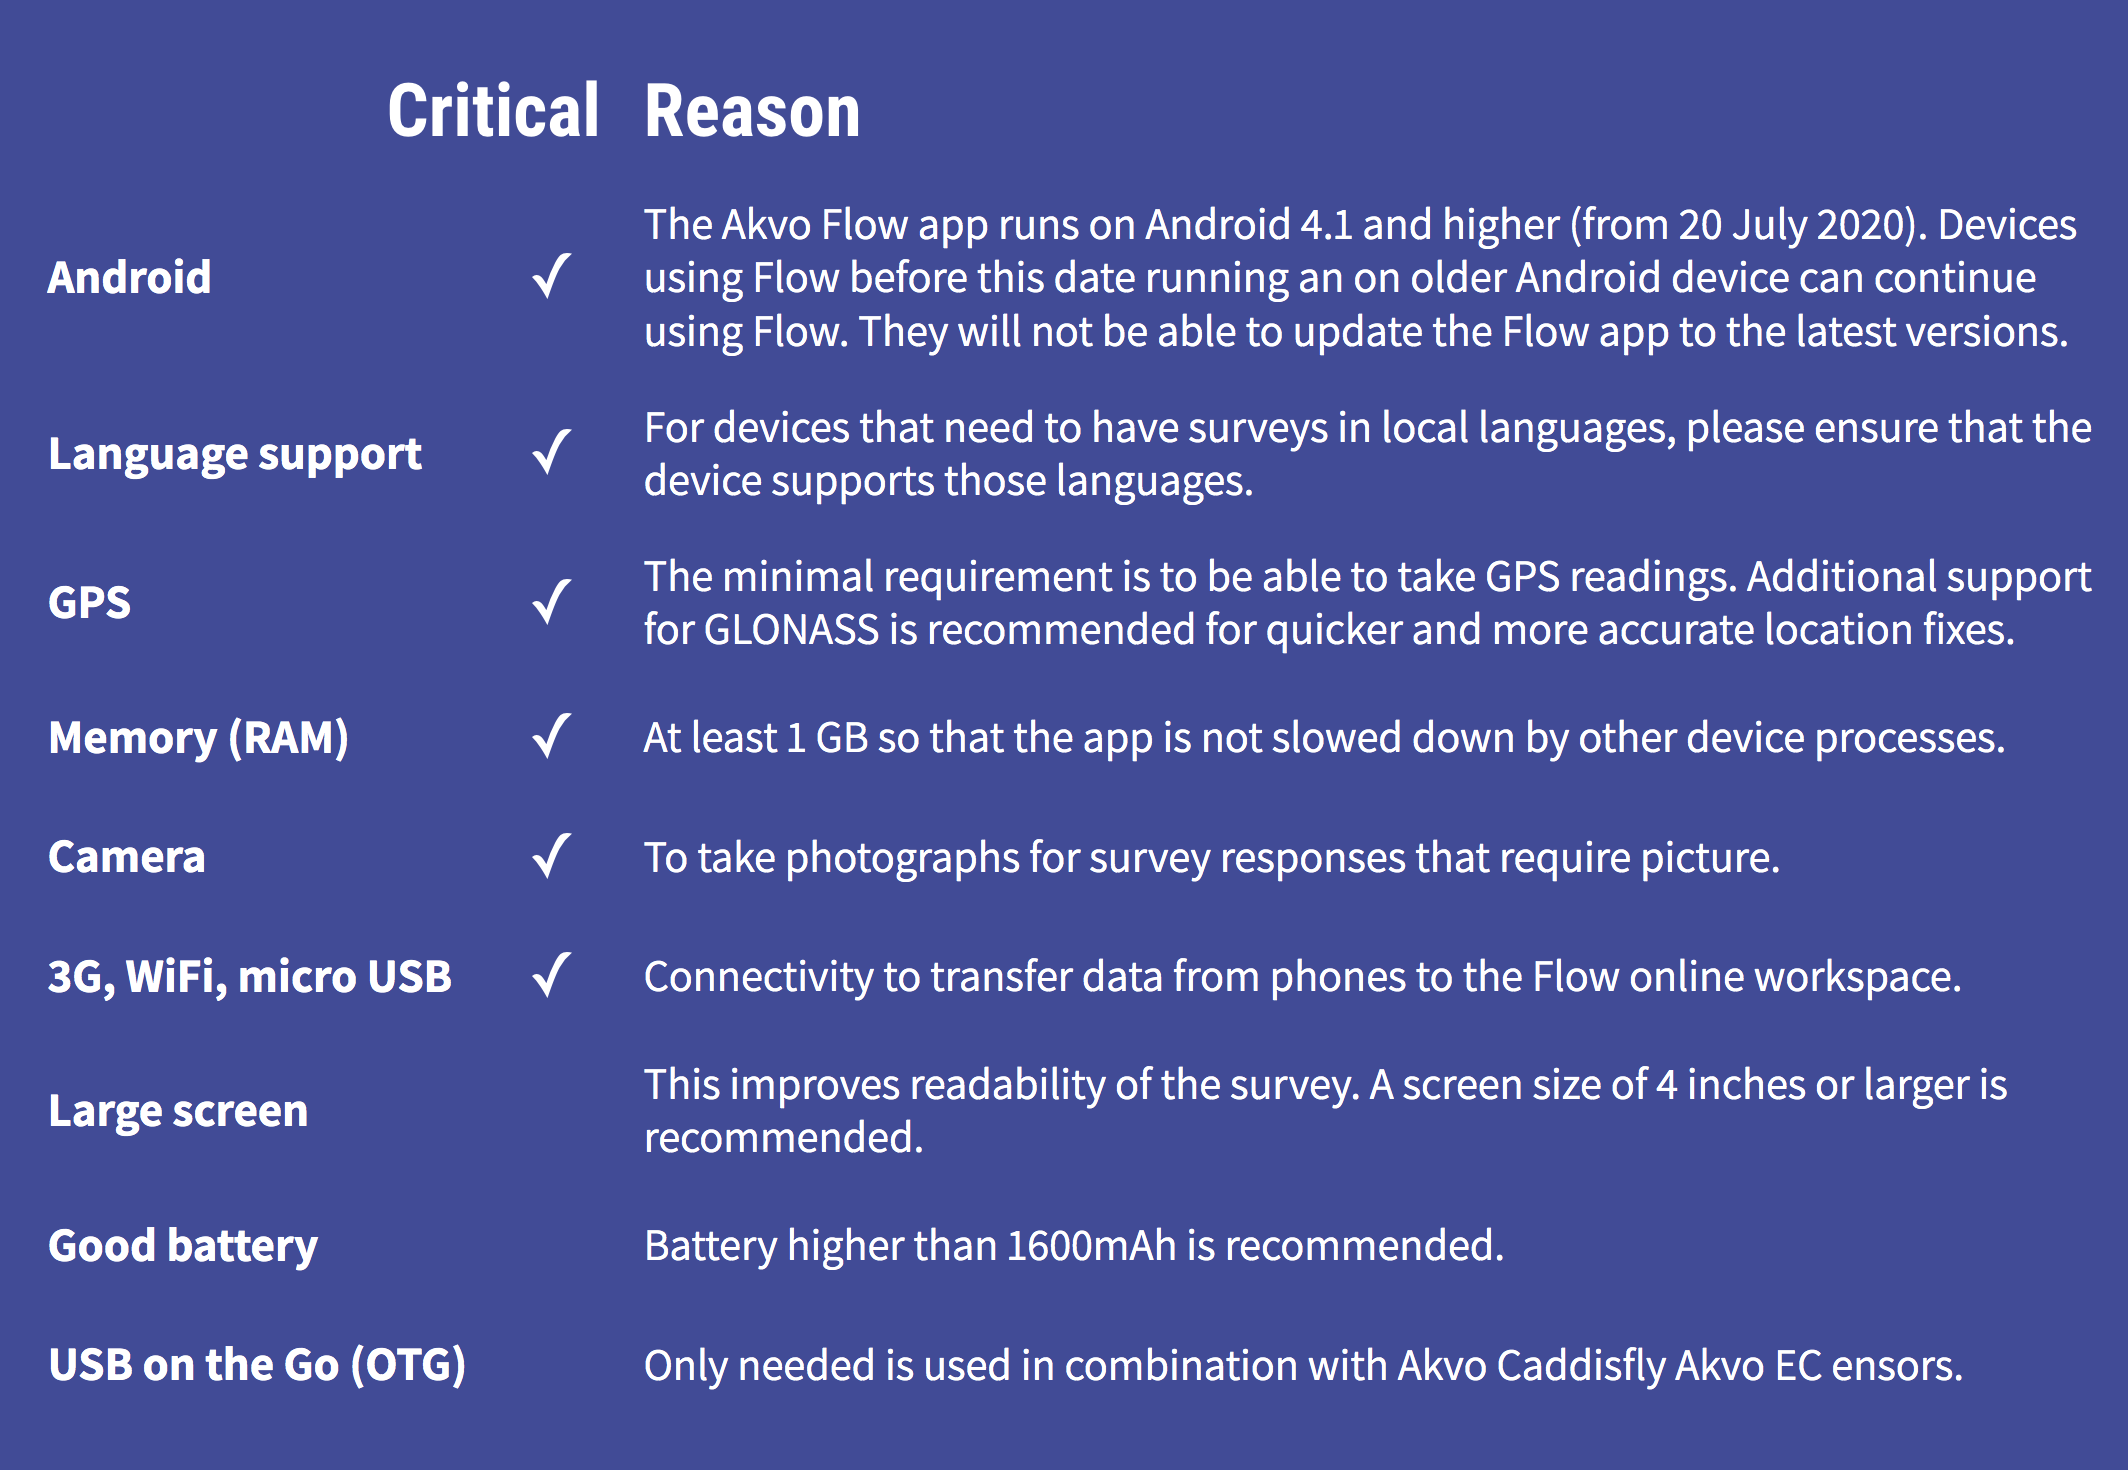
To run Akvo Flow app, your phone must meet the following hardware and software specifications:
Minimum requirements
It is essential that the phone you plan on using to collect the data runs Android 4.1 or newer.
Furthermore, it should have GPS (preferably with GLONASS support), adequate storage (at least 1Gb, either internal or through SD card) a camera, and adequate screen size (at least 3.7 inch).
Important things to consider when selecting a particular phone are battery life, camera resolution, durability, screen size and SD card size. Akvo can assist you in recommending a particular type.
In order to get full advantage of the map features included in the app, the device must have Google Play Services installed. Most devices already include this app out of the box, and (usually) users do not have to manually install this software. To check out if your device does include this service, go to your device’s Settings section, and select Apps option. Google Play Services should be listed here.
Some devices do not have SD card support, and have an storage built-in. Many of these devices will still be capable of running Flow app, but it is recommended to cross check with Akvo.
When in doubt, please consult with Akvo before buying devices to run Flow, especially if you are buying large numbers of devices. If you do not follow these guidelines and/or do not consult with us, there is not much we can do to help afterwards.
Recommended requirements
Devices can be used with or without SIM card. If you use a SIM card, data can be send over the phone network, or using Wi-Fi. If you don’t use a SIM card, data transfer over Wi-Fi is the only option.
Preparing the device to install the Flow app
Because Flow is not installed via Google Play store, you need to make sure your device allows to install apps from third-party software.
This is what you need to do:
- Under Settings, select Security.
- Enable the setting Unknown sources (If you cannot find the Unknown sources option under Security, check under Applications).
Before installing the Flow app
Before you install the Flow app on your phone or tablet, here are a few things you should check to make sure you are ready to make full use of Akvo Flow.
Date and time
Before you start collecting data, it is important to check if the date and time are set correctly. With each form submission we also save the time and date automatically, so it is important you have the time and date set correctly on your device. The Flow app will inform you, if your data and time are not set correctly.
Check SD card status
Before you start data collection, you need to check if there is enough space available on your SD card. We recommend that at least 2 GB is available. However, 4 GB will be better if you need to collect many photos as well.
To check how much space is left on your SD card:
- In the home screen click Settings, and then Preferences.
- Click SD card and storage.
- Here you can see how much is the total space and available space.
Connect to a network
Even thought the Flow app supports offline data collection fully, working with the app online makes your data collection project easier. You can either connect to a network using Wi-Fi or a data plan.
To connect the phone to a Wi-Fi network:
- On the home screen of the phone, press Settings.
- Under Wireless and Network, the default setting for Wi-Fi is off. Enable it.
- Select Wi-Fi. A list of available Wi-Fi networks displays.
- Choose the network you have access to and provide the password, if prompted.
- Select Connect. When connected to Wi-Fi, you can see this Wi-Fi icon at the top of the screen
Another option is to use your mobile data (or data roaming) to connect to a network.
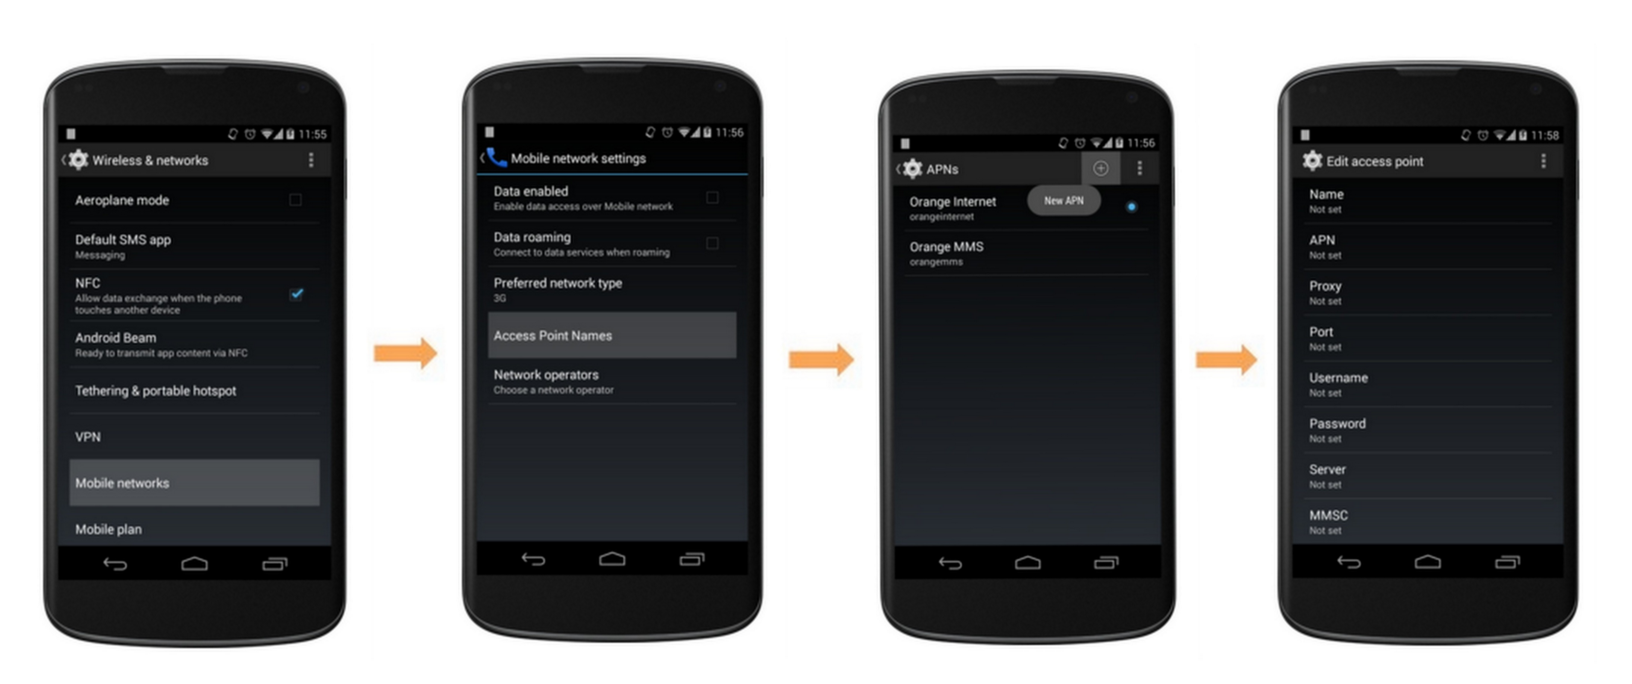
Set Access Point Name (APN)
Depending on your situation, this section may not be necessary. If your data plan is already working for your phone, you can skip this.
Local Internet service providers use APN settings to activate data plans using SIM cards on phones that were purchased abroad. Every service provider has different APN settings and they change these settings periodically for security reasons. When you purchase the SIM cards, ask the Internet Service Provider to give you the correct APN settings for the SIM Card.
To set the Access Point name:
- On the home screen, press Settings.
- From the options, choose More… and then select Mobile Networks.
- Select Access Point Name.
- Press the Menu button and select New APN.
- Fill in the required APN settings for your SIM card. You can get the correct APN settings for the SIM Card from your Internet Service Provider.
- Press the Home key when you are done.
What does the Flow app use?
With Akvo Flow app you capture data. This in practice means that you can take pictures as part of your submission, see the date of the submission, capture GPS location, or view your data points on the map. To do all this and more, the Flow app needs to access different parts of your tablet or phone.
For users using an Android version older than 6.0, when you install the Flow app, you see a list of all parts of your device Flow app needs access to. For devices running an Android version 6.0 or later, some permissions which are considered by Android as more sensitive will require the you to accept them manually, one by one (if you are running Flow app 2.7.1. and newer). This means that we ask to access different parts of your device when they are being used.
Flow app permissions - Location: required for geolocation questions. If available, it is also used for image geotagging and in all the displayed maps. - Phone State: necessary to identify your phone for the assignment of forms and to upload data points. - Storage: we use your device storage to save forms and media files.
This is valuable as not only you can directly start using the Flow app after installing, but you also know which part of your device the Flow app is using when. To make sure the Flow app works properly, we need access to these parts of your device. You can always revoke the granted permission anytime through phone's or tablet's Settings application.
Installing the Akvo Flow app
Installing the app online
Akvo Flow app is only Android based and not available on Google Play store. To install the app online you use the browser of your device and your Flow instance url. You can also install the app to your device offline. Here you can find more on the steps you need to take.
Installing the app
- Open the browser on the device. The browser app might be called Internet or Browser, or it could otherwise be an specific browser name (i.e. Chrome, Firefox, etc)
- In the browser address bar, type the address of your Flow online space, and add ‘/app2’. For example, if your organisation is called ‘care’, this would usually be ‘care.akvoflow.org/app2’.
- Confirm. This will download the latest version of the Flow app directly. You will see the download icon in the notification bar at the top of the screen.
- When the download is complete, draw down the notification bar from the top of the screen. If the download succeeded, you will see flow-2.x.x.apk, download complete.
- Click on the notification, and click Install. Once the installation is complete you can open the app.
Installing the app offline
Akvo Flow app is only Android based and not available on Google Play store. When internet is not available, there is an alternative way to install the app by putting the app file (apk) directly on your device. To do so follow these steps:
- Get the Flow app APK file on your PC or laptop. For this, you need to be connected to the internet. You can get the file by opening a web browser, and in the address bar type the address of your Flow online space, and add ‘/app2’. For example, if your organisation is called ‘care’, this would usually be ‘care.akvoflow.org/app2’. Save the APK file to your computer.
- In the location without internet connection, connect the device to a computer using a usb cable, so you can see the contents of the SD card. On the SD card, create a temporary folder, for example called ‘temp’.
- Copy the Flow app .apk file to this temporary folder.
- Disconnect the device from the computer.
- On the device, open the app called ‘My Files’, and locate the temporary folder that holds the APK on the device.
- Click the APK to install it.
Note: If My Files app is not available in the device, you can use any other app capable of browsing the file system (i.e File Manager).
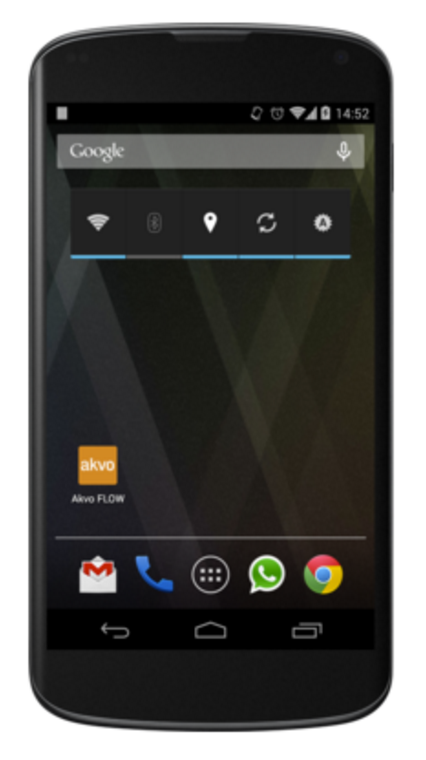
Create a shortcut on the home screen
For easy access, create a shortcut to the Flow app on the home screen. To create a shortcut:
- Click on the Applications icon on the phone home screen.
- From the list of applications, press and hold on the Flow app icon.
- The shortcut to the Flow app now appears on your home screen.
Getting started with the Flow app
Setting up your user and device ID
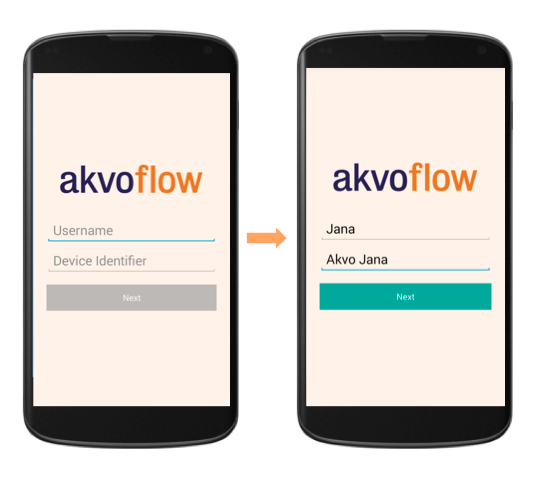
Once you open the Flow app for the first time, there are two items you need to add in order to proceed: your user name and the ID on your device. This name will be used to identify the device on the Flow online space.
Once both of the fields are filled in you continue by pressing Next. The Next button will not be enabled until you fill in both fields.
Initial screen after starting the Flow app for the first time.
Remembering users
The Flow app remembers the active user. Each time you open the Flow app, the last user is automatically selected. You will see a quick message in the bottom of a screen telling you who is the logged in user. If you want to switch between users, you need to select the user via the side menu and the user list.

Different parts of the Flow app
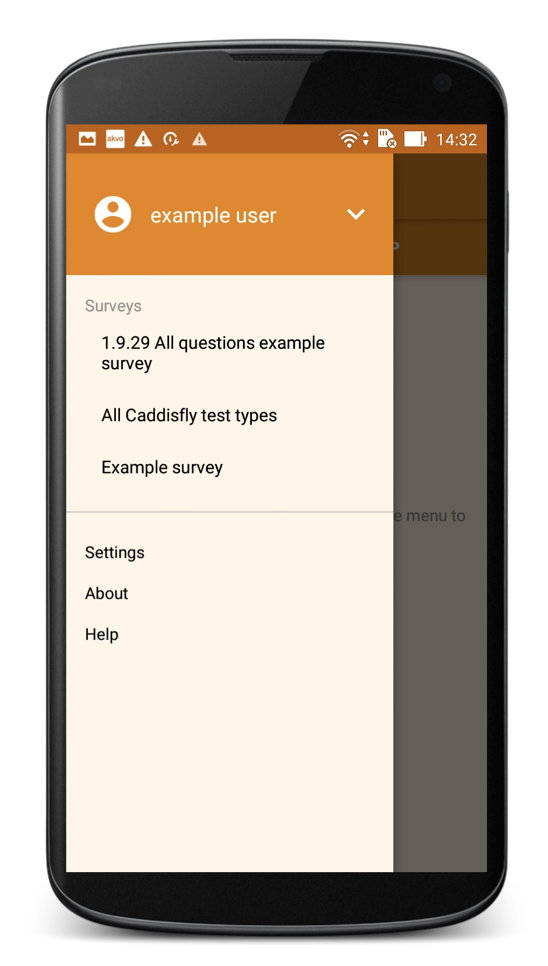
Side navigation menu
Every time you click on the menu icon located in the top left corner of the app screen the side menu opens. This menu holds four important parts:
- Active user and User management
- Survey list
- Settings
- About
- Help
Active user and User management
To be able to submit data with Flow app, you need to be logged in with a user account. You can have one or multiple users using the same device to capture data, so here you can see who the active user is, select another user, edit existing users, etc. To learn more about user management in the Flow app, check these articles.
Survey list
The second item in the side menu is your list of surveys. This list holds all surveys assigned to your device. A notification (little dot) on the side menu indicates that new surveys have been downloaded on the Akvo Flow Application.
One clicks on the name of the survey if you want to open the questions and collect data. For more information on surveys in the app check here. If you have no surveys in your list, but there are surveys assigned to your device, you need to check your internet connection and restart the app
Settings
Settings is the third item in the side menu. By clicking on Settings you open a more detailed list of actions to download a form, set the language of the app, check available storage, and more. Here you can find more details on the available settings.
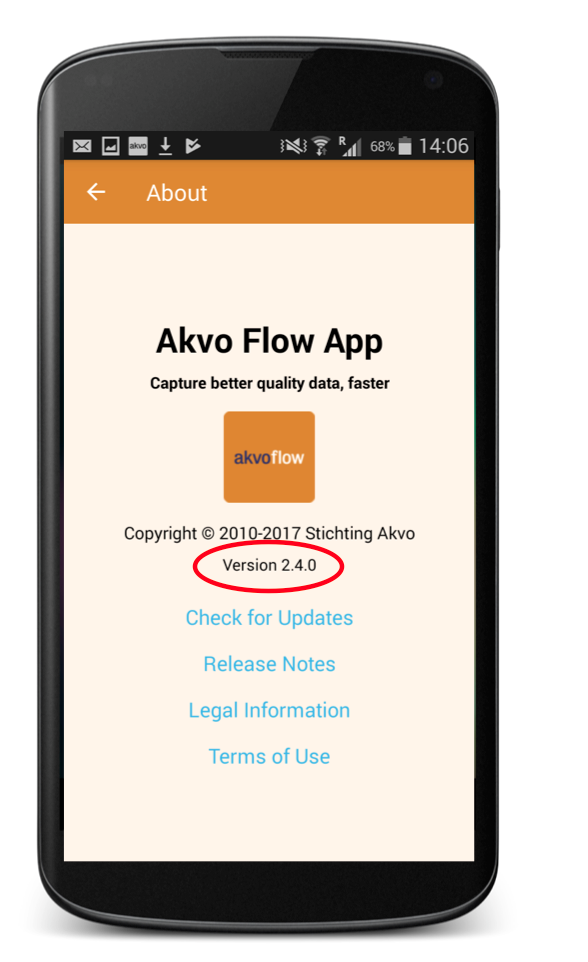
About
About holds all the basic information you need to know about the Akvo Flow app, as the version you are running, if there is a new version available, what changes have we made in the release note, or our terms of use.
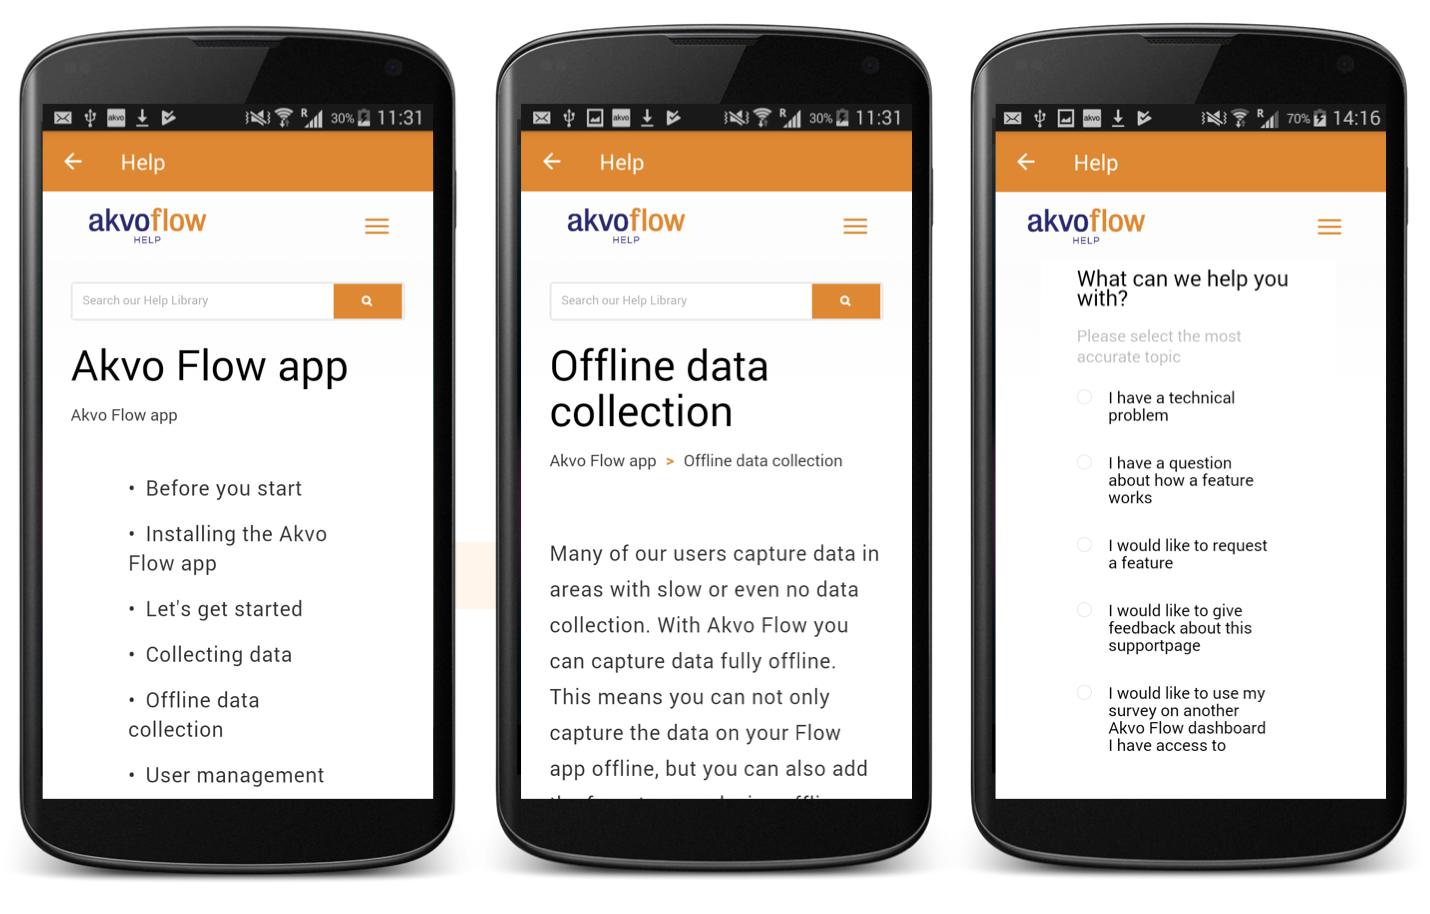
Help
Via the new Help page you can access our support documentation, if connected to the Internet. Browse the support documentation or answer the questions you have about using Flow's app directly when working with the app.
List of data points
After you have selected a survey in the side navigation menu, you will see the list of data points in your Flow app.
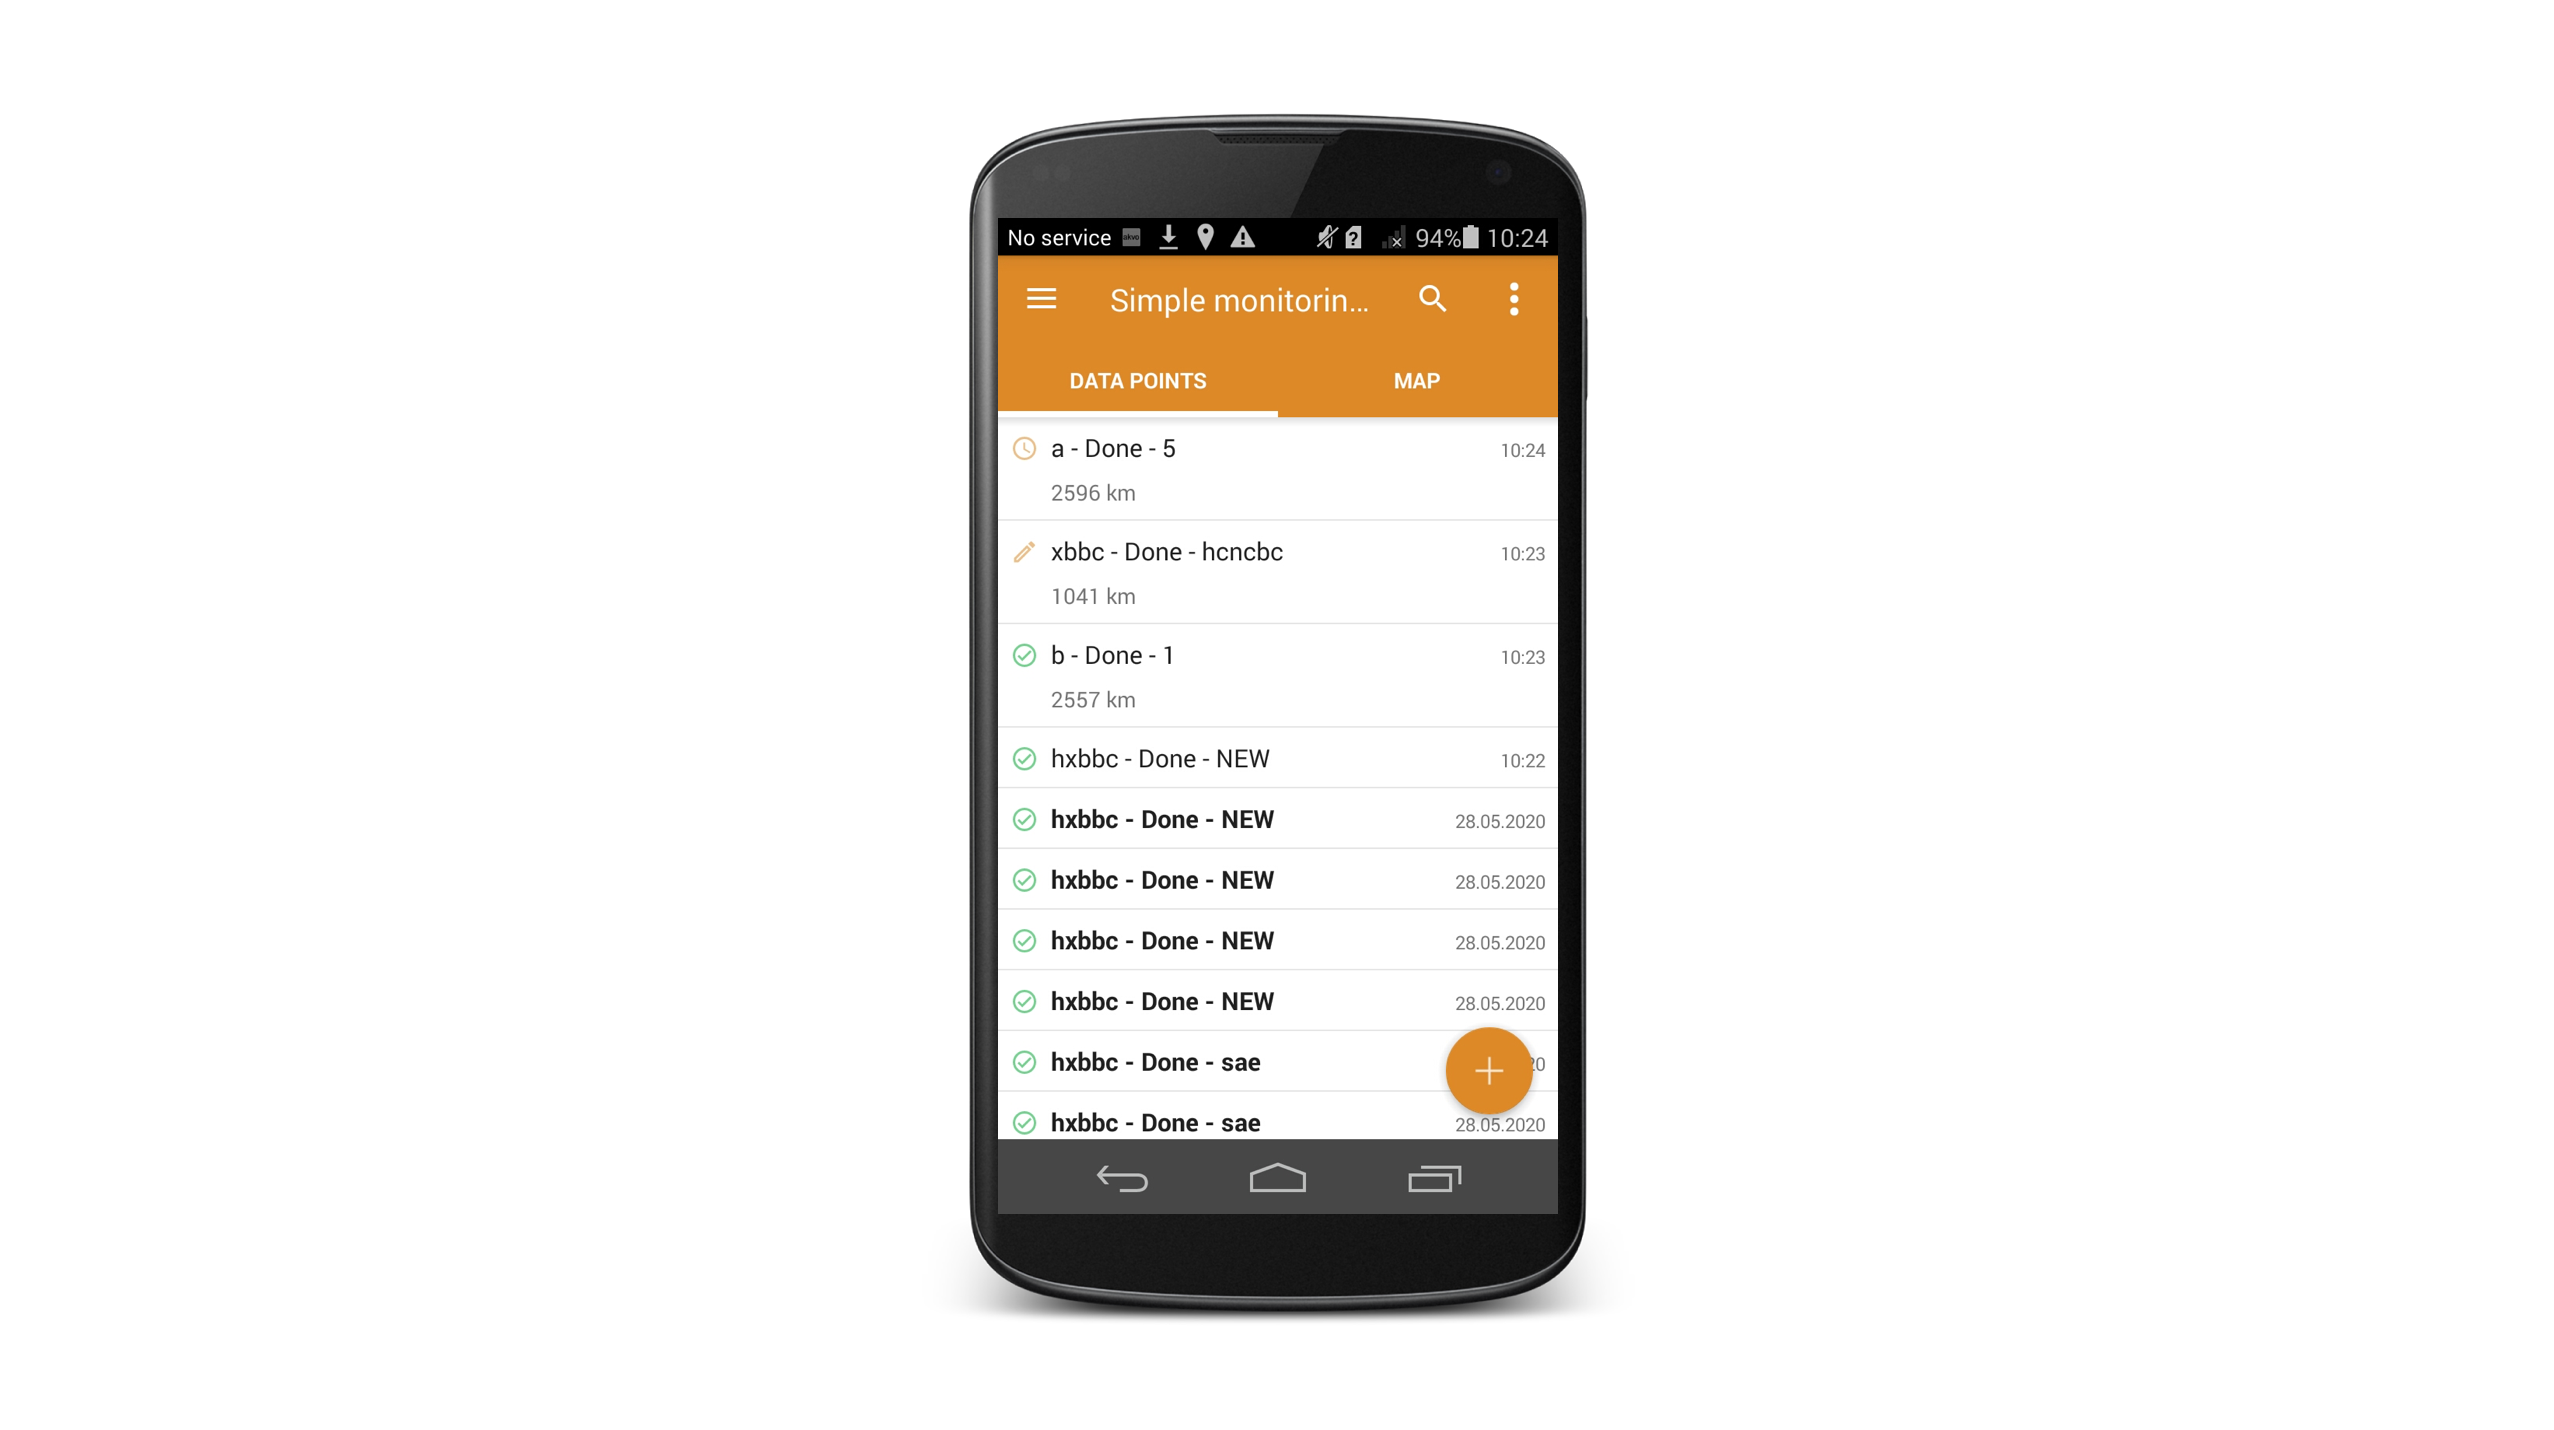
Now you can see the list of data points you have captured for your survey and the survey title on the top of your screen. The top left menu icon brings you to the side navigation menu. You can search fro a specific data point using the search icon. Next to the search icon, there is another menu icon, which we call the overflow icon and is placed in the top right corner of your screen. This icon holds the options to Sync in data points for this monitoring survey, to Sort the data points, and to see the Stats about the survey.
The list of data points shows you details about the data points: the point name, ID, when was is last modified and what its status is. You can read more here. If you want to see the points based on their location select the Map option.
Here is also where you capture new data using the + (plus) icon.
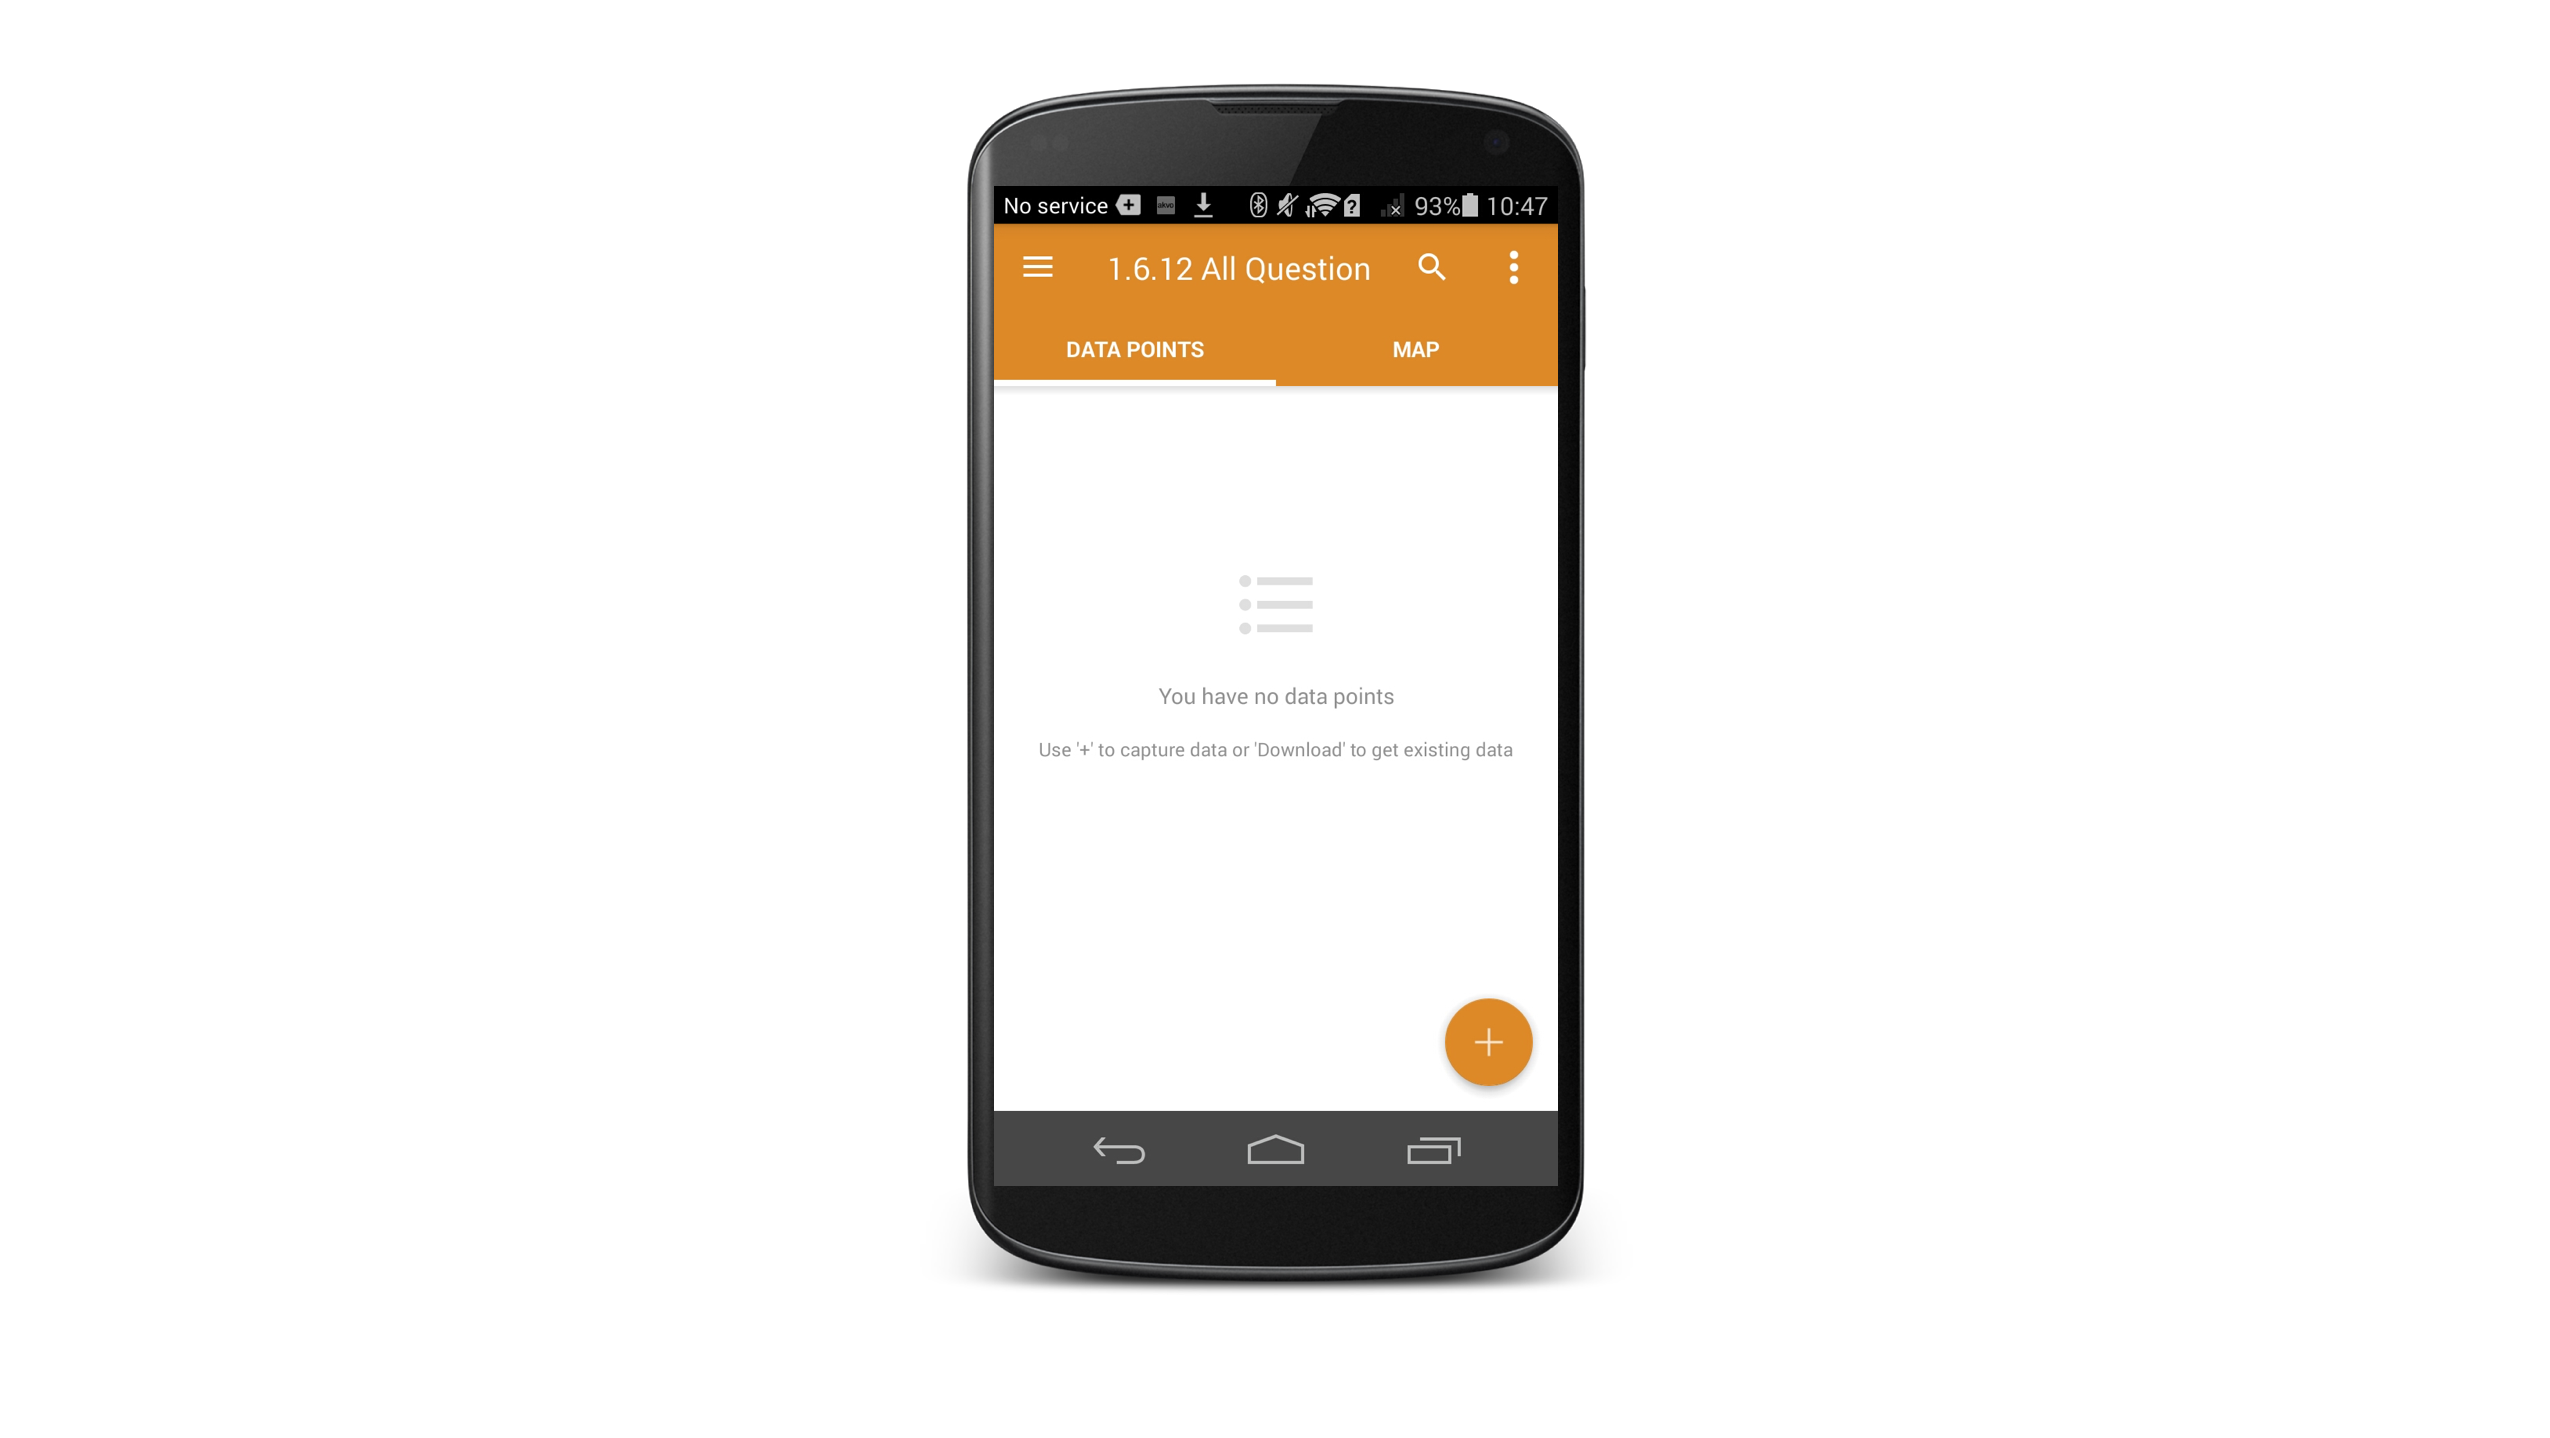
If have not captured any data yet to your survey, your list of data points will be empty. You can either capture a new data point or for monitoring forms sync in the existing data points to further monitor.
Form menu
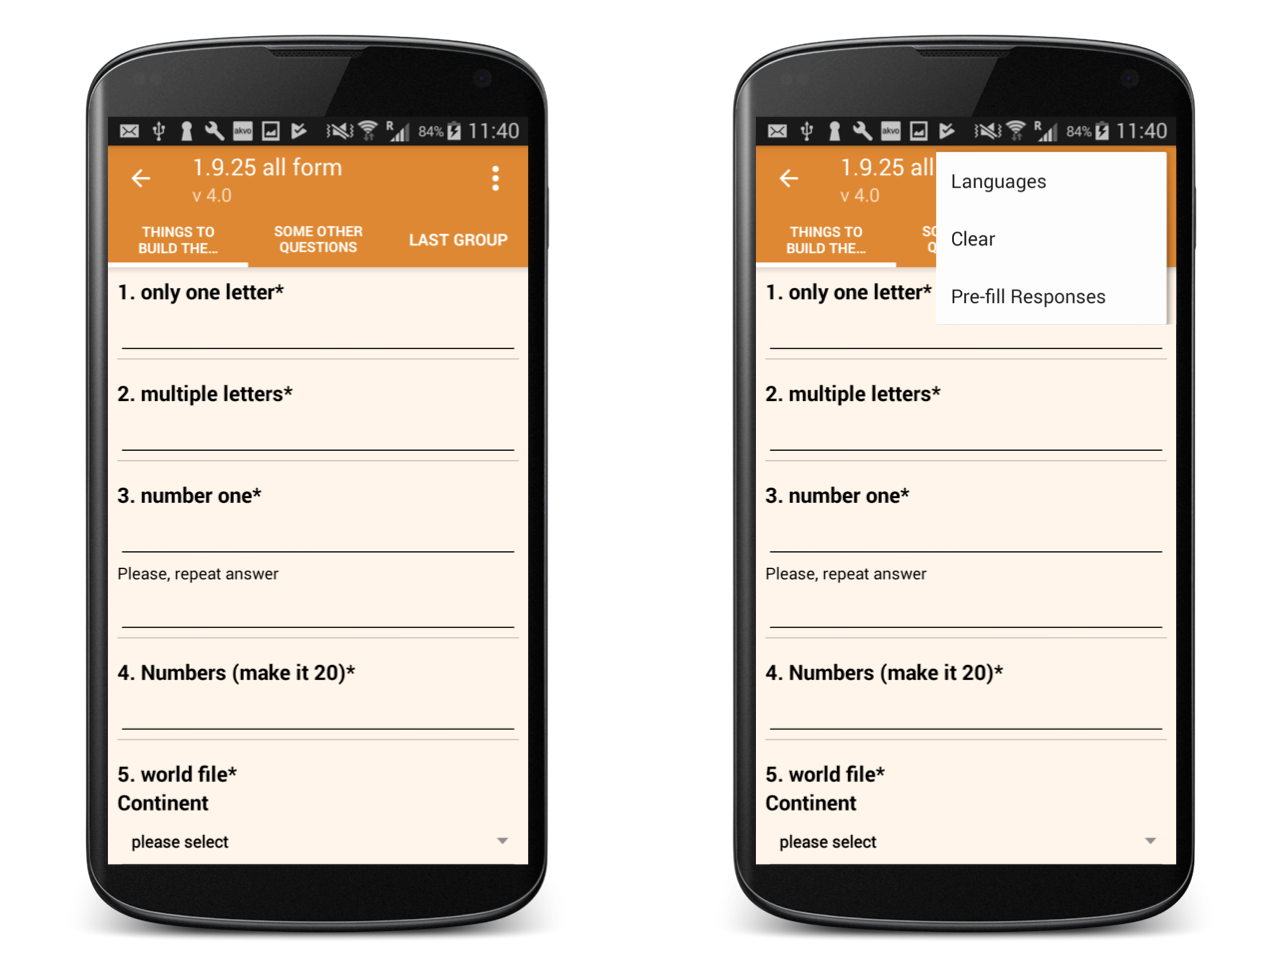
After you have selected your survey and opened up the new empty form to submit answers you will see the Form page.
Here you can see the title of the form and the version you have currently on your device. Please note that your form might be updated and have a higher version number. It is always good to check that you have the latests version of your form on your device.
There are two icons in the top of your screen, an arrow and another menu icon.
The arrow icon allows you to go back to the previous page. If you have not filled in any answers to the form questions, you will not see any change in your list of data points. If you have filled in at least one answer to a question in the form and go back, then the form is saved as a new data point (status saved). You an always open the saved data point and continue filling in the form.
The menu icon on the right side of your screen opens up the form menu. Here you have three options to choose from. Languages gives you the option to see your questions in different languages, if your form is translated. Clear makes it easy to wipe out all the answers you have added so far (before submitting) and start fresh. Pre-fill Responses is an option available only for monitoring forms. It takes the answers from a previously submitted monitoring form and adds the answers to the question.
The different question groups that hold the questions are located in the tabs under the form title and version. You can navigate through the different question groups either using the Next button under the questions or swiping left and right. The last question group is followed by the Submit page.
Flow app Settings
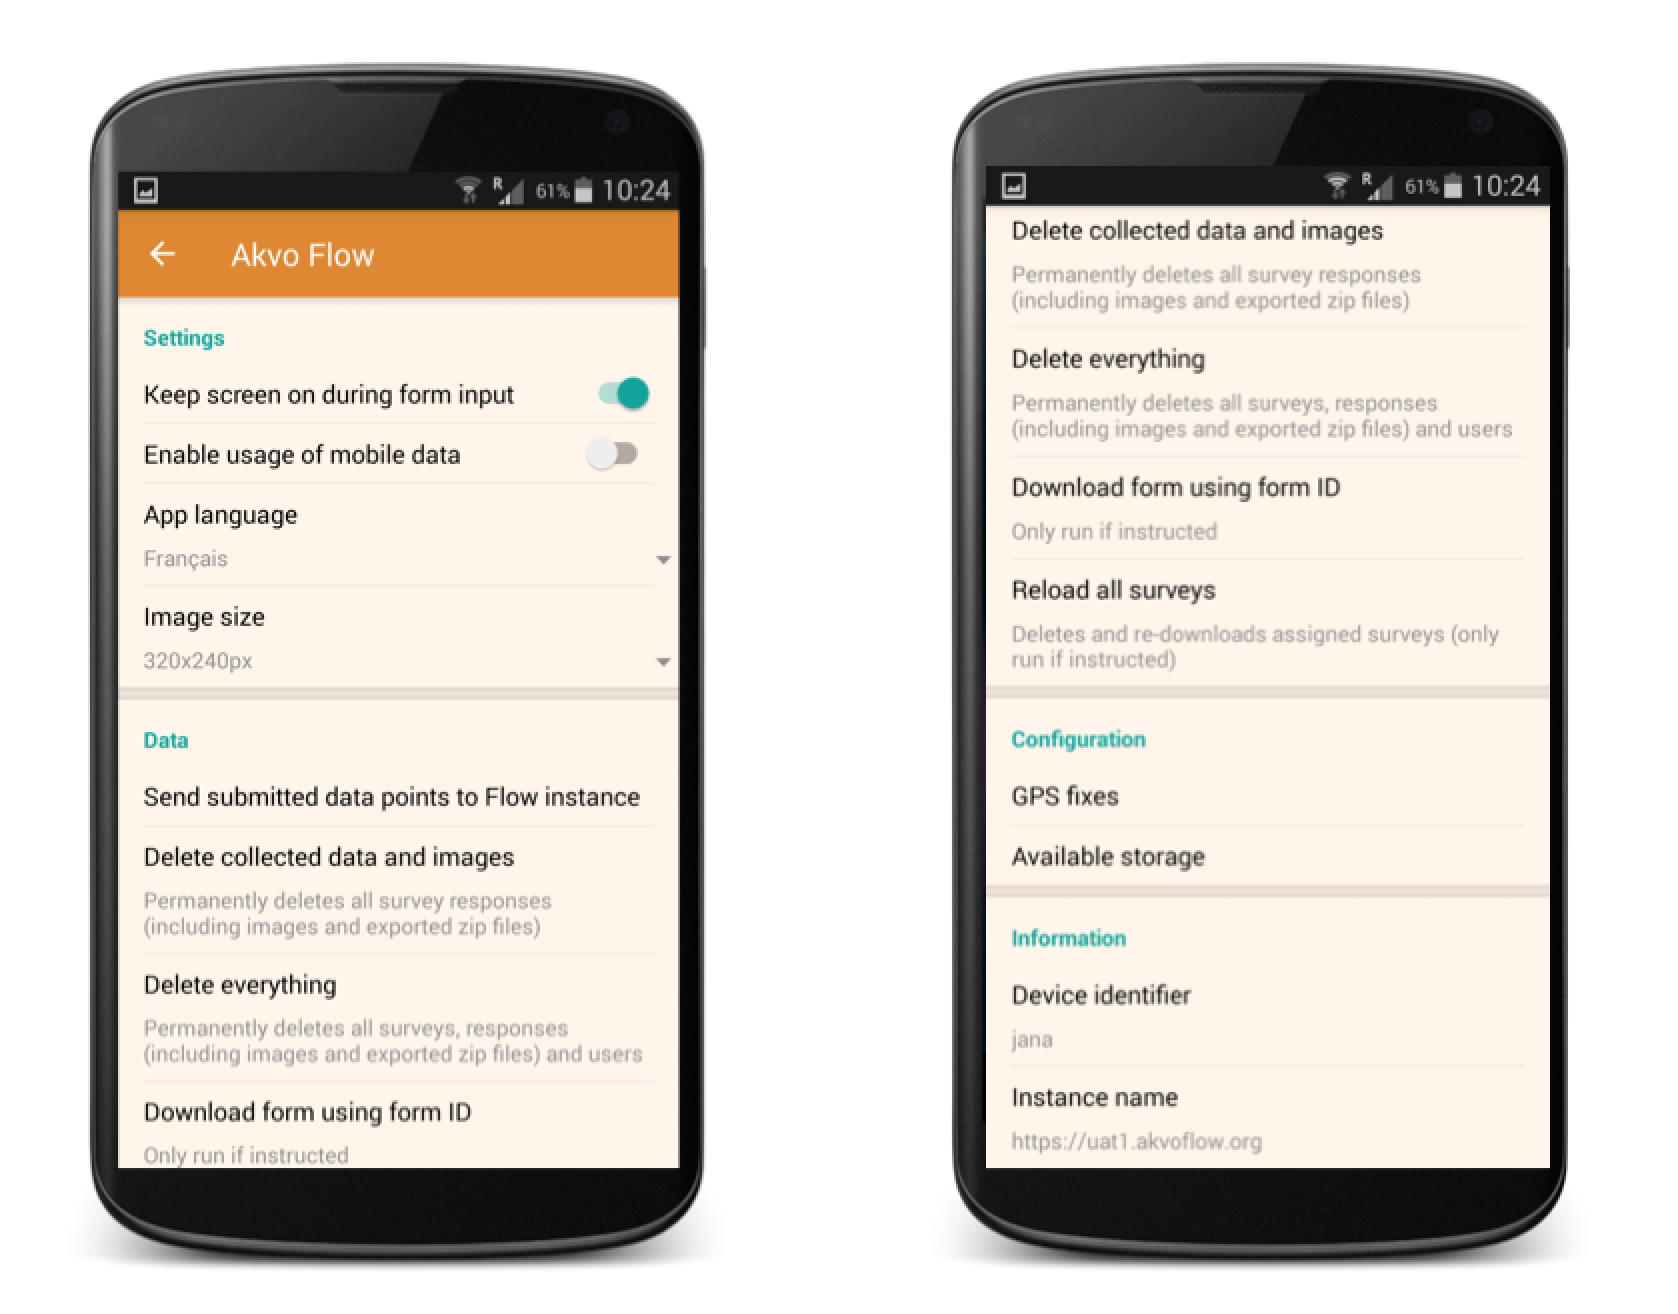
Settings is the third item in the side menu. By clicking on Settings you open a more detailed list of actions to download a form, set the language of the app, check your storage, and more. Settings are divided into four categories and each holds information and actions that will help you capture data easier.
Settings
The Settings category holds items you usually set up for the first time using your Akvo Flow app to customise your data collection experience. Every time you open or update the app these settings are remembered.
Keep screen on during form input
If turned on, your screen will not lock when working with the Flow app. Depending on your device settings your device might lock after a few seconds. When you are capturing data it might be cumbersome to always have to unlock your device to input a new answer. With this setting the Flow app will make sure your screen is always on when working with Flow.
Enable usage of mobile data
When capturing data in remote areas or in the field, you usually do not have wifi connection available. You can capture data offline, or decide to have your submitted forms sync to your Flow instance immediately using your mobile data. Keep in mind that by enabling usage of mobile data you might create extra costs on your data bundle.
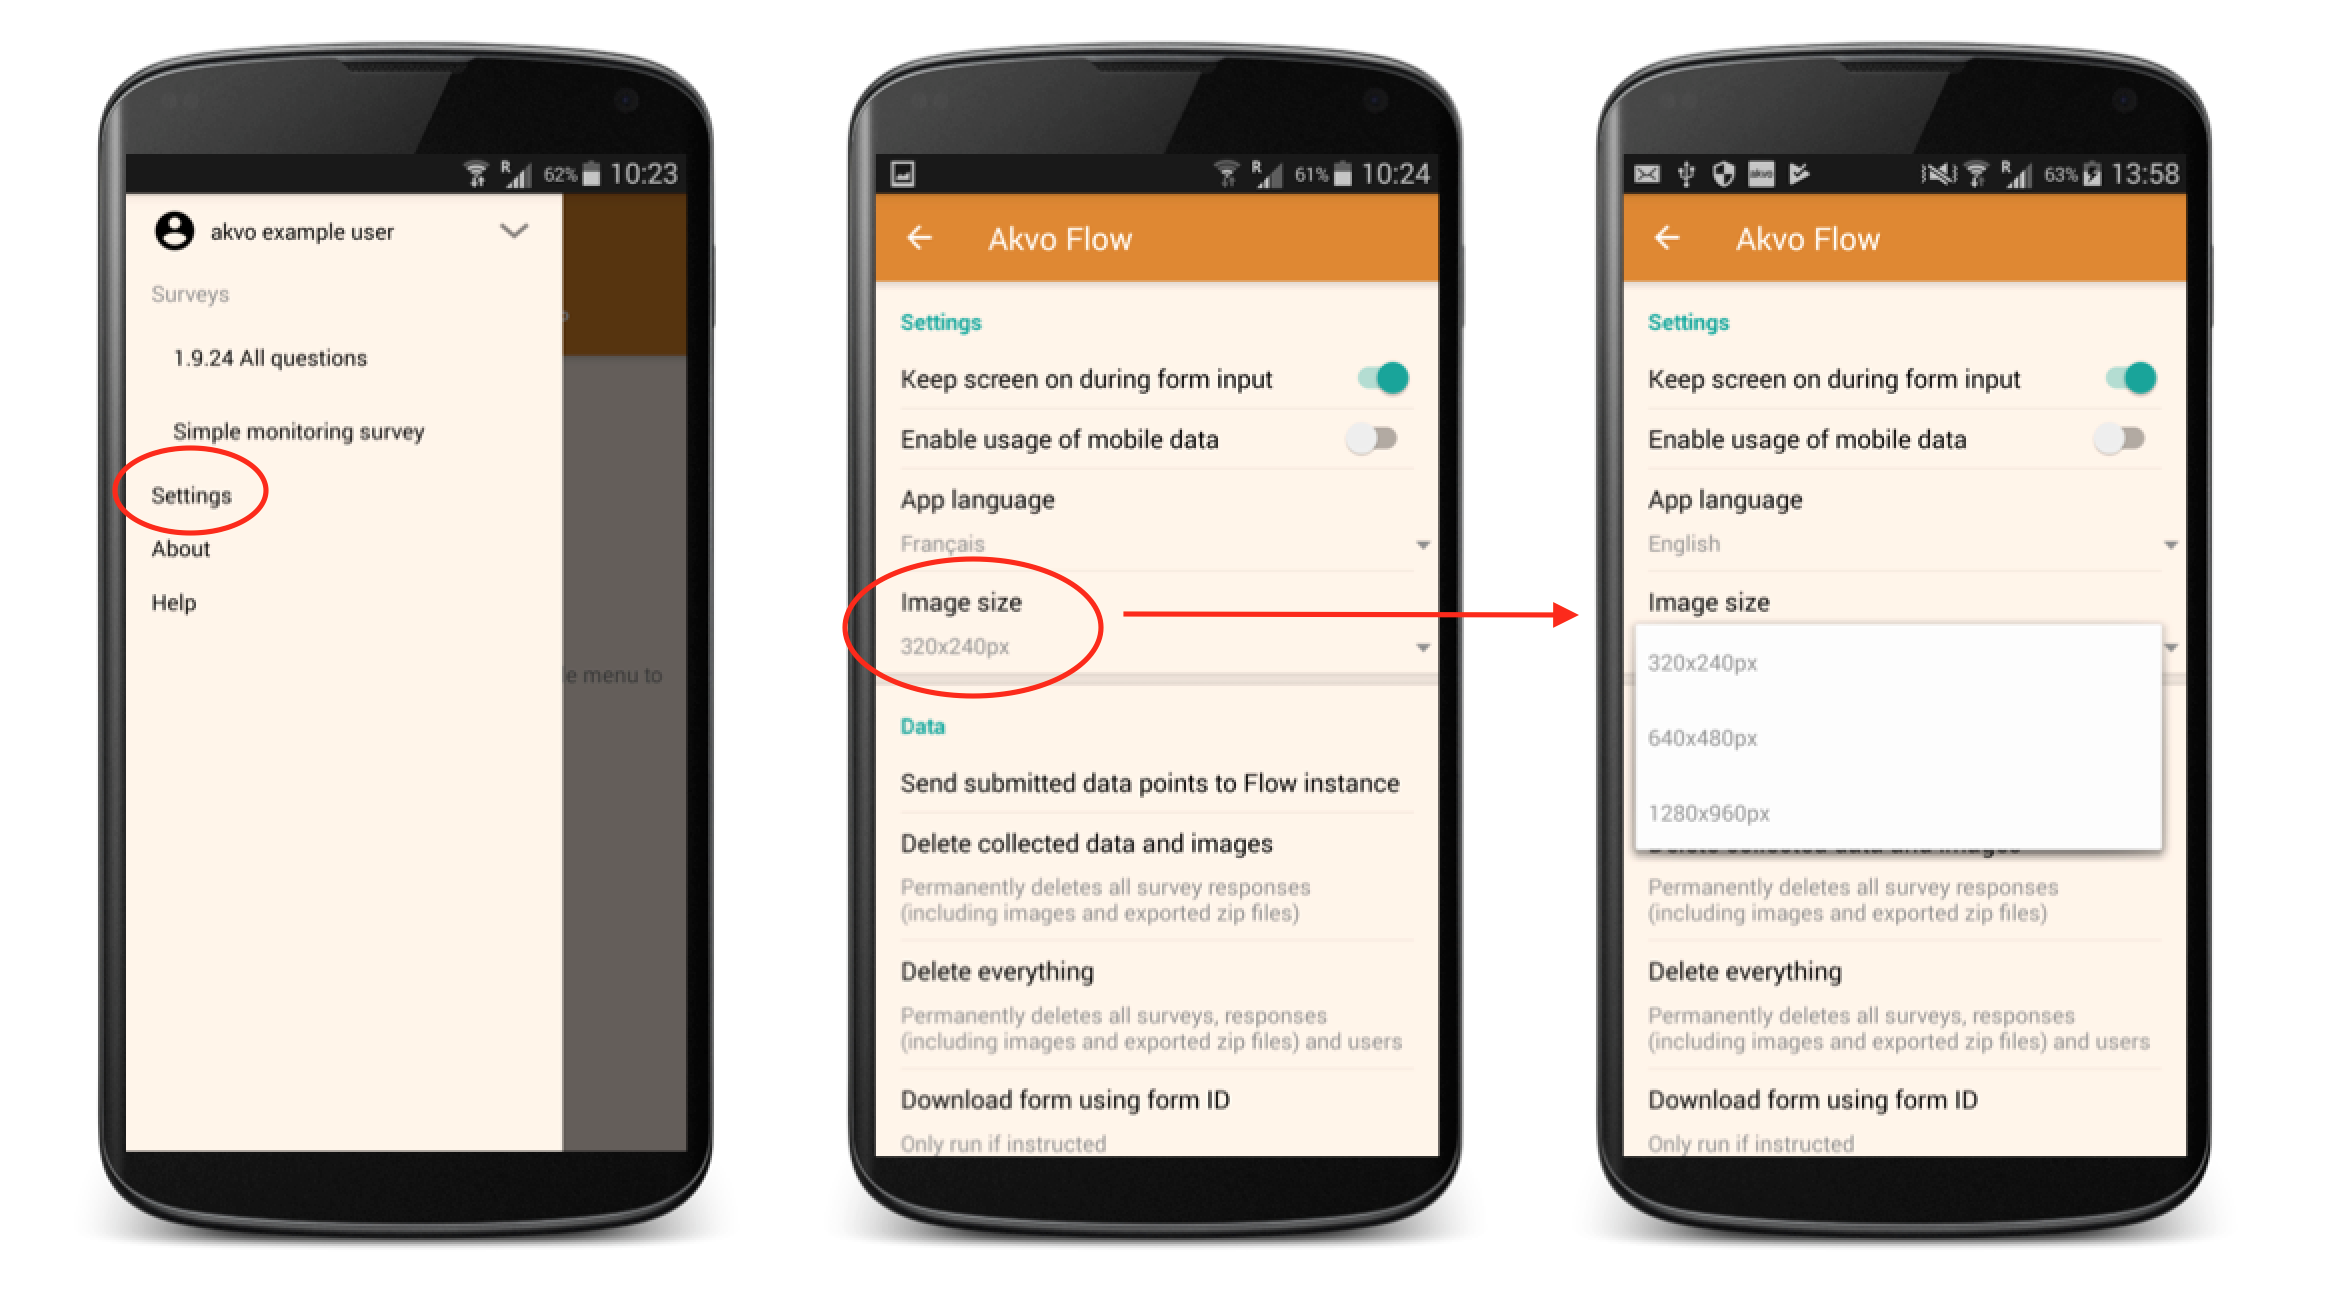
Image size
If you are collecting photos with your data, you can decide the size of the photo. By default we use the minimum size (320x240px). This is to ensure data upload does not fail in areas with low connectivity and the data usage is not too high. There are three possible sizes to choose from.
Data
Send submitted data points to Flow instance After you submit your data, the data point is in the status "exported". This means that your responses are saved but did not fully sync to your Flow instance. This may be cause by the size of the responses, or speed of the internet connection. In result your data is not yet fully available on Flow.
To trigger your responses to fully reach Flow, click on this option and it will re-start the process of sending the data. Check the list of data points and you should see that all submissions are now synced, indicated by the green icon.
Delete collected data and images
This option deletes all data collected on your device including all images and videos. This is helpful is you are starting a new data collection exercise and want to create space on your device. Make sure all the data is fully synced to your Flow instance before deleting.
Delete everything
If you want to start fresh, with new surveys and no data or if you want to change the user and device ID all in one go, this is the option for you. With delete everything you get a fresh new Flow app. Make sure all the data is fully synced to your Flow instance before deleting.
Download form using form ID
You can either assign a form to a device using an assignment, when the form is automatically synced to your device, or you can download a form manually. To do so, you need to know the administrator password and the form ID, that is shown in the survey editor on Flow's online workspace. Here you can learn more on how to download a form using the form ID.
Reload all surveys
Often surveys forms are changed and improved to match the project needs or sometimes to simply improve the questions. To make sure you always have the latest version of your survey forms on your device, you can close and reopen the app or Reload all surveys. This action will check all the forms you have on your device and update their versions. Also it will check if new forms are assigned to you and add them to your device. However, by reloading all surveys, the surveys you now have on your device will first be deleted and then re-downloaded again make sure you have all data submitted before you run this action.
Configuration
GPS fixes
Before any data collection or when travelling large distances, it is good to make sure your GPS is calibrated. This ensures that all location answers, geographic shapes, or photo geotags are captured with the best possible accuracy. To calibrate your GPS you can select this option. It will open a GPS calibration app, if installed on your device. To learn more about GPS calibration, check this article.
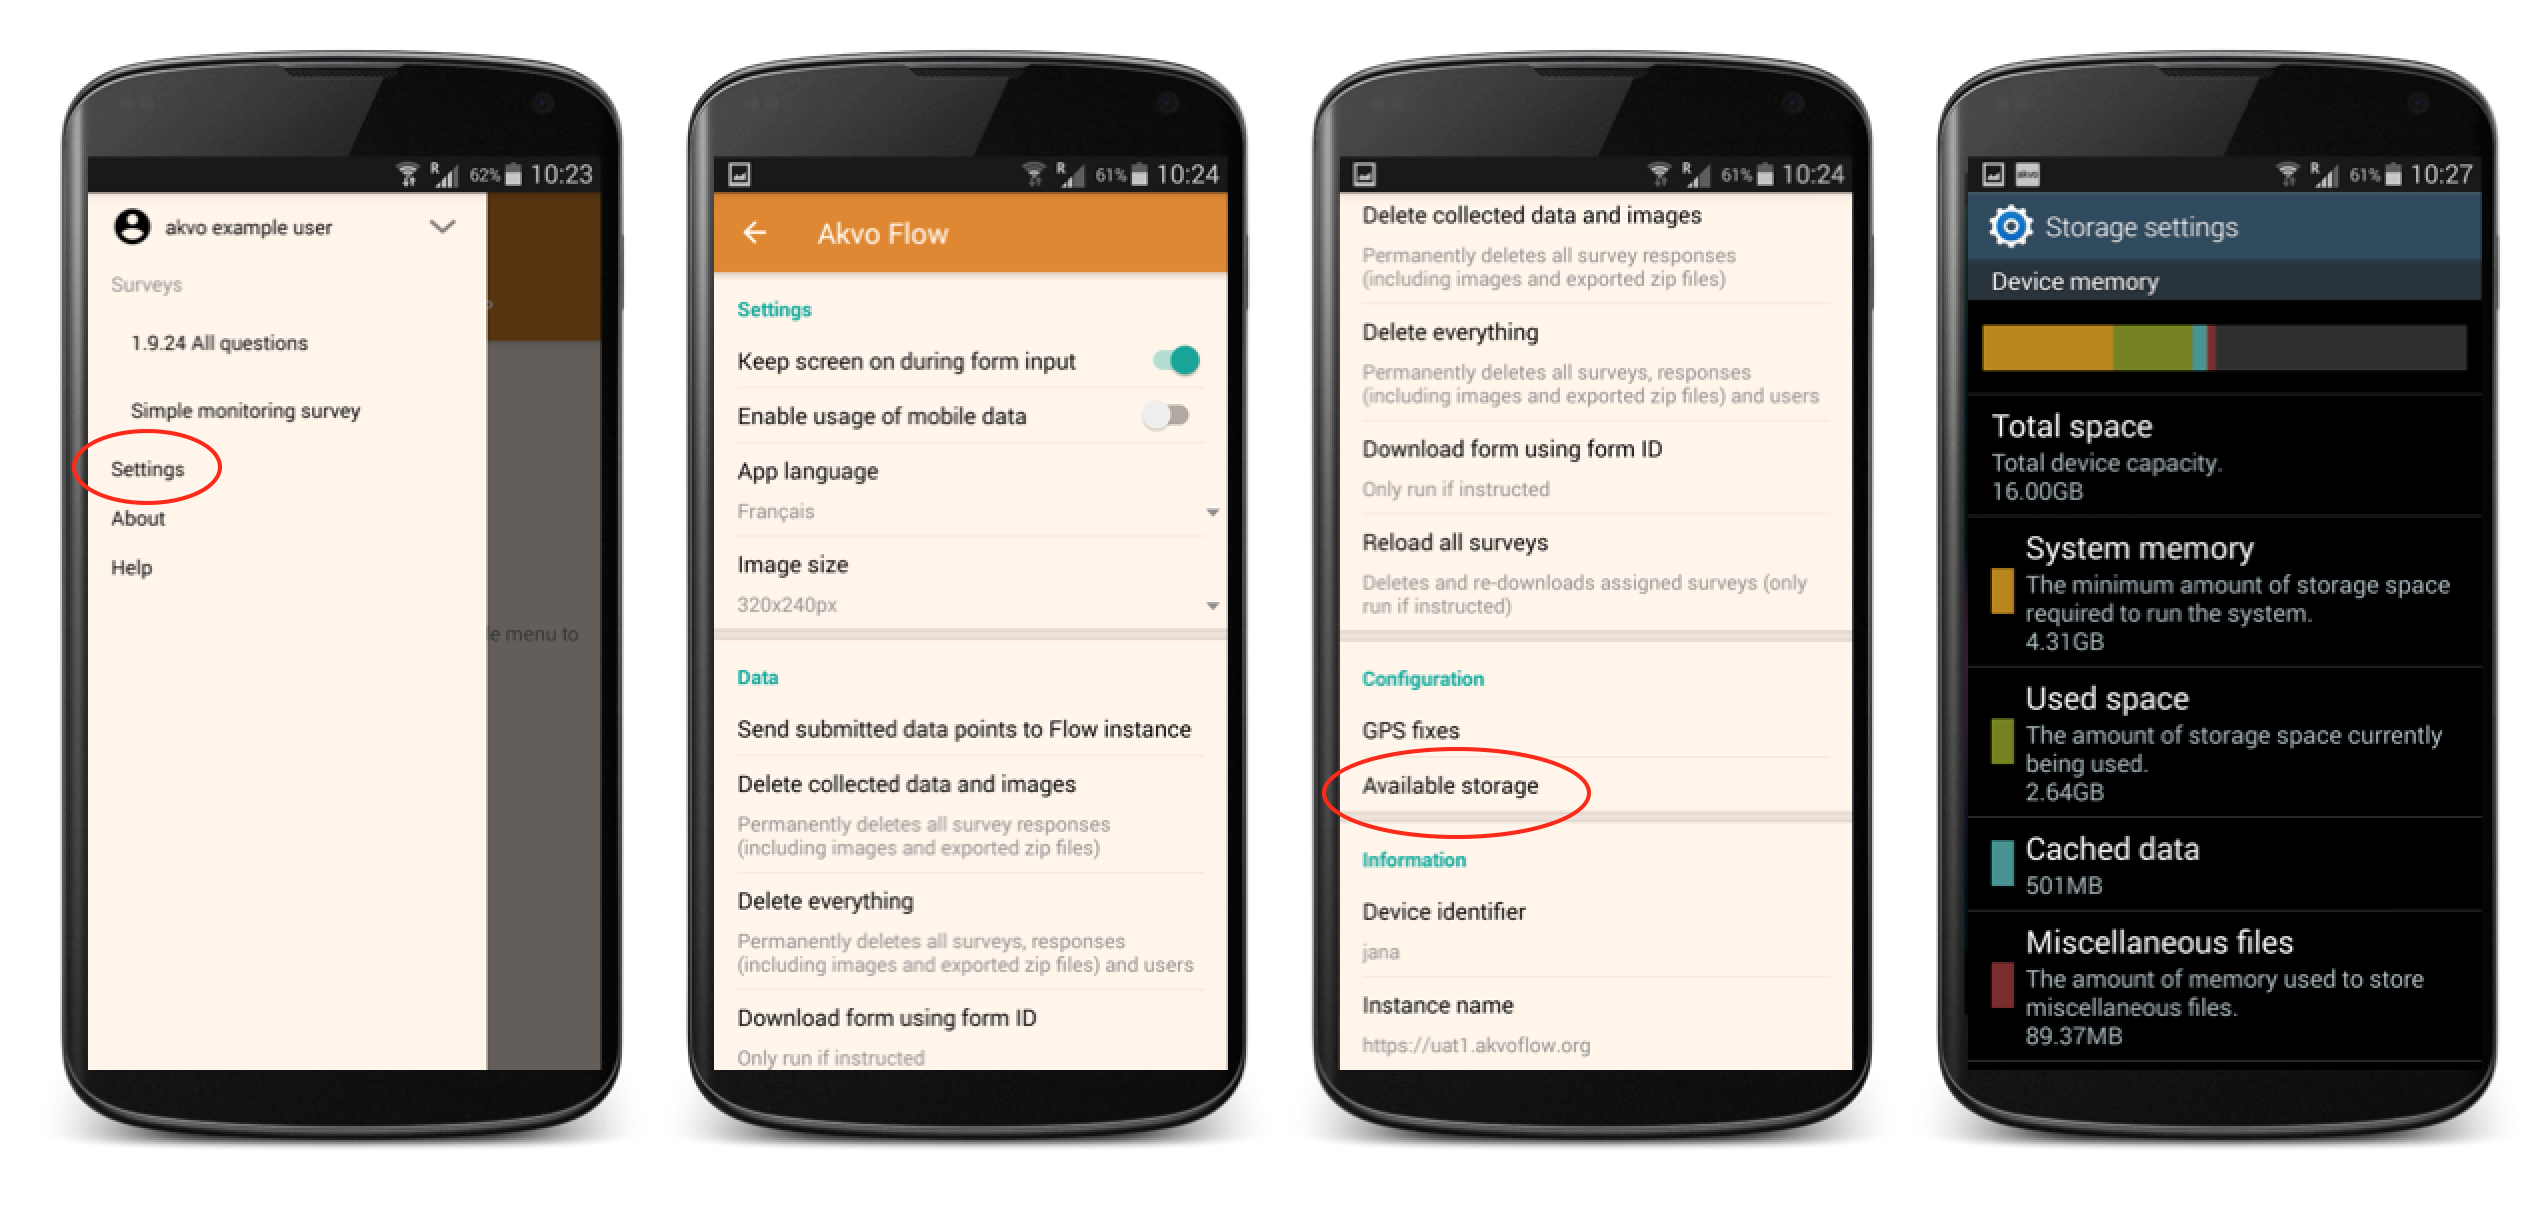
Available storage
Before each data collection exercise you want to make sure you have enough space available on your device to be able to capture all the data, images, videos, etc. that you need. Here you can learn more on how to check how much space you still have available on your device.
Information
Device identifier When starting working with your Flow app, you must set a user name and a device ID. Here you can check what the Device ID for this device is.
If you want to change the Device ID, you need to first Delete everything.
Instance name
Each Akvo Flow app communicated with a specific Akvo Flow instance that we have created for you and your organisation. This instance has a distinct url (xxx.akvoflow.org) and you app makes sure you only receive surveys from this Flow instance and that your data is only synced to it.
Sometimes you might have collected data for different organisations. In these cases you always need to install the app from the right instance. To make sure you are working with the Flow app connected to the right instance, check the url here.
Flow app languages
The Flow app is available in multiple languages. We currently provide these languages: Bahasa Indonesia, English, Spanish, French, Hindi, Dutch, Portuguese, and Vietnamese. The language of the Flow app is based on the language of the device.
It can happen that after selecting your preferred language some parts of the Flow app are still in English. This happens when not everything is translated. We translate the Flow app with the support of our partners, If you are interested in contributing to our translations, or would like Flow to be translated to another language, let us know via the Contact us page.
Change size of captured photos
If you are collecting photos with your data, you can decide the size of the photo. By default we use the minimum size (320x240px). This is to ensure data upload does not fail in areas with low connectivity and the data usage is not too high.
There are three possible photo sizes to choose from:
- 320x240px
- 640x480px
- 1280x960px
If you want to change the size of photos or make the images as large as possible in the Akvo Flow app:
- Open the Flow app and go to Settings in the side navigation panel
- Under Settings you will find Image size
- Click on Image size
- Select the size you prefer
Checking available storage
Before each data collection exercise you want to make sure you have enough space available on your device to be able to capture all the data, images, videos, etc. that you need.
To check for the available storage on your device:
- Open the Flow app and go to Settings in the side navigation
- Scroll down to Configuration where you will find Available storage
- Click on Available storage
- The Flow app will bring you to the devices settings where you can see the total space on your device and what is available for you to use.
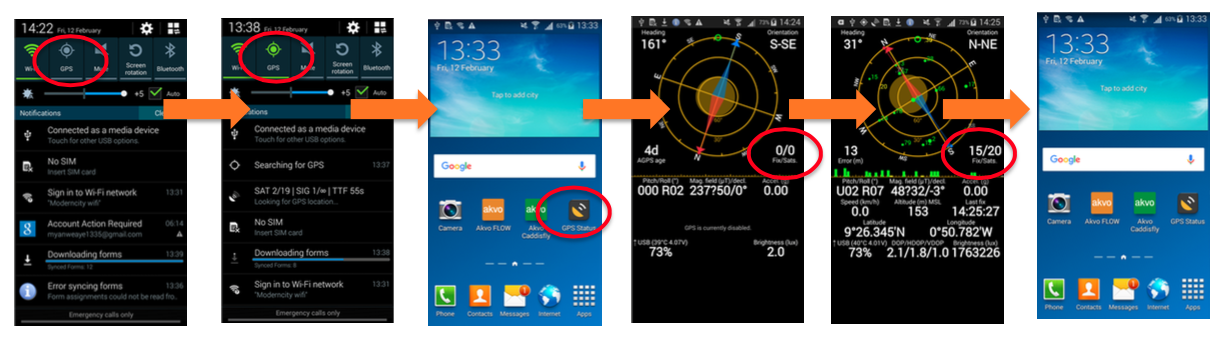
Calibrate your GPS
Every time a device is moved more than 500km, the GPS system needs to be re-calibrated to ensure GPS coordinates are accurate.
The calibration can be done with or without a SIM card in the phone. If the phone has a working data connection, either through Wi-Fi or using a SIM card, the calibration process takes only a few minutes. If these are not set correctly, it can take up to 30 minutes.
An easy way to check if the GPS is calibrating correctly is to use the free app ‘GPS Status & Toolbox’, which can be installed from the PlayStore. You can also install the app from your Flow space. Simply add "/gps" after your Akvo Flow url in the browser on your device and the GPS Status app will download directly to your phone.
To calibrate GPS
- Take the phone outside to a location where there is a clear view of the sky. It makes no difference whether the sky is cloudy or clear.
- Ensure that the GPS is turned on
- Ensure that you are in an open area and NOT inside a building
- Open the GPS Status app
- Keep the device static and DO NOT move around with it. If possible away from reflecting surfaces such as walls
- Monitor the status of the GPS data being received by the device in the GPS status app.
- If you still do not get a fix after 15-20 mins, re-locate to a different spot few meters away and try again
Making sure your app is always up to date
The Akvo Flow team actively works on improving the performance of our app and your experience when using it. To run the app with the latests features and improvements you need to make sure you update your app version.
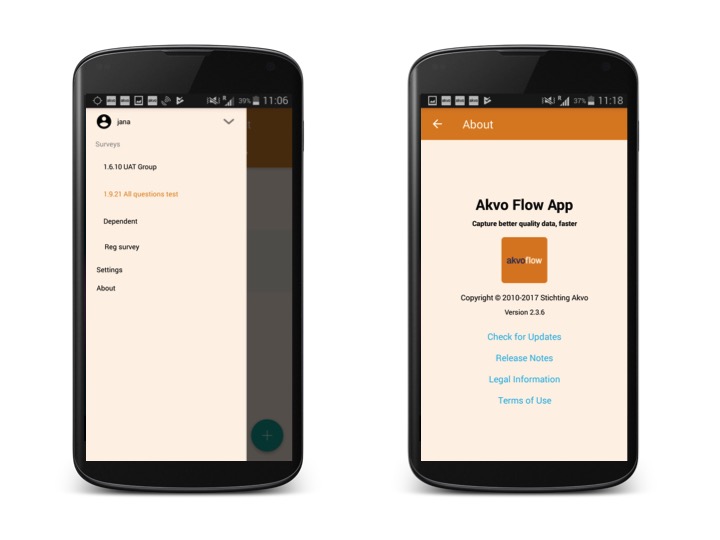
Check your app version
To check which version of Akvo Flow app you are currently running on your phone or tablet go to About in the side menu. Here you can find the information about the version of your app.
Updating the app
In order to update the version of the app, that you are running, you need to be connected to the internet. There are two ways to do so, one is automatically, once a new update is available, or manually, anytime when using the Flow app.
Automatic update
Every time we release a new version of the Flow app, you will be notified when in the app. After opening your Flow app you a message will show on your screen. Select "Install". This will start the update process.
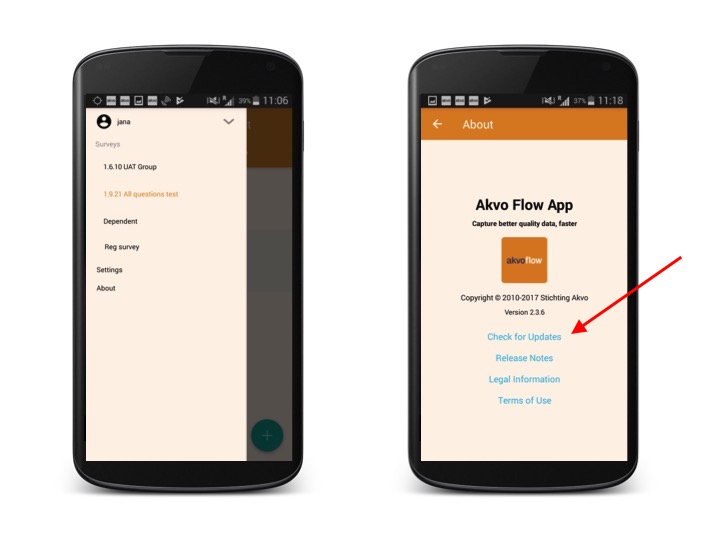
Manual update
You can also check if there is a new version of the app available. Go to Settings and to the About page. Here select "Check for updates".
Staying up to date with the latests changes
Here you can read what changes we have released. If you are looking for even more detail, you can always check our GitHub release notes.
User management
Creating a new user
Every time you open up the Flow app you will see which user is logged in. You can have multiple users collecting data with this device. Each user should have their own account with a recognisable user name. During data collection, a specific user needs to be selected so that you can later see who submitted the data.
Create a new user
- Go to the side menu
- Open the user management field by clicking on the arrow next to your currently active user in the side menu. Now click on + User.
- Fill in the name of the user you want to add and select OK. If you do not want to add a new user, click Cancel.
- The user is automatically selected as the active user and added to the list of users.
Editing users
If you want to change the name of a user long press on the username you want to edit. In the Edit user screen make the changes you want and press OK.

Deleting users
If you want to delete a user long press on the username you want to delete and select Delete user. Confirm this action by pressing OK in the following screen. The user is now removed from your user list on the Flow app.

How do I change the Device ID?
You have already set up your Device ID, which will be used to identify the device on the Flow online space. If you need to change the Device ID follow these steps:
To change the Device ID:
- Click on Settings in the side menu.
- Select Delete everything.
- Enter the administrator passcode.
- Hit the back arrow on the top of your screen.
- Flow now brings you to the first page where you set your user name and device ID. Here you can change the device ID.
Please note that when Deleting everything you will not only delete your user name and device ID, but also all the data captured on your device and surveys on your device. Make sure all data is submitted to Flow before making these changes.